How to install a lockable mailbox?
May 20, 2025
Leave a message
Hey there! If you're looking to enhance the security of your mail and personal items, installing a lockable mailbox is a smart move. As a lock supplier, I've seen firsthand the importance of a good lock on a mailbox. In this blog, I'll walk you through the steps of installing a lockable mailbox, from choosing the right one to the actual installation process.
Step 1: Choose the Right Lockable Mailbox
The first step in installing a lockable mailbox is to choose the right one for your needs. There are several factors to consider when making your selection.
Size
The size of the mailbox is crucial. You need to make sure it's large enough to hold your daily mail, including magazines and small packages. But at the same time, you don't want it to be too big that it becomes a target for theft or vandalism.
Material
Mailboxes come in a variety of materials, such as metal, plastic, and wood. Metal mailboxes are durable and offer better security, while plastic ones are lightweight and more affordable. Wood mailboxes can add a touch of charm to your home, but they may require more maintenance.
Lock Type
There are different types of locks available for mailboxes. Some common ones include combination locks, key locks, and padlocks. If you're looking for a simple and reliable option, a key lock is a great choice. You can check out our Brass Copper Padlock or Key Iron Padlock for high - quality key - based locking solutions.
Step 2: Gather the Necessary Tools
Once you've chosen your lockable mailbox, it's time to gather the tools you'll need for the installation. Here's a list of basic tools:
- Screwdriver (both flat - head and Phillips - head)
- Drill
- Measuring tape
- Level
- Pencil
- Wrench
Step 3: Select the Installation Location
The location of your mailbox is important for both convenience and security.
Accessibility
Choose a location that is easily accessible for you and your mail carrier. It should be visible from the street and within reach of the mail carrier's vehicle.
Security
Avoid placing the mailbox in a secluded or hidden area. It should be in a well - lit and visible spot to deter potential thieves. Also, make sure it's installed at a height that makes it difficult for someone to reach over and break into it.
Local Regulations
Before installing the mailbox, check your local regulations. Some areas have specific rules regarding the height, distance from the street, and style of mailboxes.
Step 4: Prepare the Installation Site
Once you've selected the location, it's time to prepare the site.


Mark the Location
Use a measuring tape and a pencil to mark the exact location where you'll install the mailbox. Make sure it's level and centered.
Drill Holes
If you're installing the mailbox on a post, use a drill to make holes in the post according to the mailbox's mounting holes. If you're installing it on a wall, make sure the wall is strong enough to support the weight of the mailbox and drill holes accordingly.
Step 5: Install the Mailbox
Now comes the actual installation part.
Attach the Mounting Bracket
If your mailbox comes with a mounting bracket, attach it to the post or wall using screws and a screwdriver. Make sure it's firmly attached and level.
Mount the Mailbox
Place the mailbox on the mounting bracket and secure it with screws. Use a wrench to tighten the screws if necessary.
Step 6: Install the Lock
After the mailbox is installed, it's time to install the lock.
Read the Instructions
Different locks have different installation methods. Read the instructions carefully before you start.
Attach the Lock
Most locks can be attached to the mailbox using screws. Align the lock with the designated area on the mailbox and use a screwdriver to secure it.
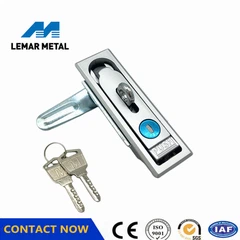
If you're looking for a unique lock option, you might be interested in our [Aluminum Sliding Door Handle Lock](/lock/aluminum - sliding - door - handle - lock.html). Although it's mainly designed for doors, it can also be customized for some mailbox models.
Step 7: Test the Mailbox and Lock
Once the lock is installed, test the mailbox and lock to make sure they work properly.
Insert the Key
Insert the key into the lock and turn it to open and close the mailbox. Make sure the lock operates smoothly and the mailbox door opens and closes easily.
Check for Alignment
Check that the mailbox door aligns properly with the frame when closed. If there are any gaps or misalignments, adjust the lock or the mailbox as needed.
Step 8: Maintain Your Lockable Mailbox
To ensure the longevity and security of your lockable mailbox, regular maintenance is essential.
Clean the Mailbox
Periodically clean the mailbox to remove dirt, dust, and debris. You can use a mild soap and water solution to clean the exterior.
Lubricate the Lock
Lubricate the lock with a silicone - based lubricant every few months to keep it operating smoothly.
Check for Damage
Regularly inspect the mailbox and lock for any signs of damage, such as rust, dents, or loose parts. Replace any damaged components as soon as possible.
Conclusion
Installing a lockable mailbox is a great way to protect your mail and personal information. By following these steps, you can ensure a successful installation. As a lock supplier, we offer a wide range of high - quality locks to meet your needs. If you're interested in purchasing locks for your mailbox or other security needs, feel free to reach out to us for a procurement discussion. We're here to help you find the perfect locking solutions.
References
- Home Improvement Guides: Various DIY home improvement blogs and websites for general installation knowledge.
- Lock Manufacturer Manuals: Manuals provided by lock manufacturers for specific installation instructions.
Send Inquiry