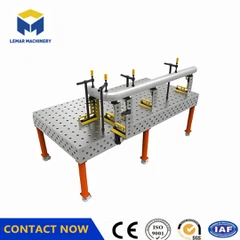


How to Prevent 3D Welding Workbench Failures?
Mar 30, 2026
Leave a message
I. Structural Maintenance: Ensuring Platform Stability
1. Regular Cleaning and Rust Prevention
Before each use, remove welding slag, oil, dust, and other impurities to prevent foreign objects from affecting workpiece fit and fixture positioning.
After use, wipe the workbench surface promptly and apply rust-preventive oil; when not in use for extended periods, cover with a dust cover or store in a dry warehouse.
2. Protect Positioning Holes and T-Slots
Spray anti-spatter liquid during welding to prevent welding slag from adhering and clogging the holes.
Use a dedicated cleaning needle or air gun for cleaning; do not use metal tools to pry, as this may deform the hole openings.
3. Avoid Mechanical Damage
Never directly strike the workbench surface with hard objects such as hammers to prevent localized dents or cracks.
Workpiece loading and unloading should be smooth, avoiding heavy pressure or... Impact causes structural deformation
II. Environmental Control: Reduce External Interference Factors
1. Keep away from vibration and electromagnetic interference sources
The installation location should avoid strong vibration sources such as large stamping equipment and air compressors to prevent long-term vibration from causing loose connections or measurement inaccuracies.
2. Control temperature, humidity, and ventilation conditions
Maintain a stable workshop temperature and avoid drastic temperature changes that could cause thermal stress changes in materials.
Good ventilation is essential to remove welding fumes and harmful gases and prevent corrosive gases from eroding metal surfaces.
3. Special protection under high-temperature conditions (for dyeing machine applications)
Install ceramic fiber heat insulation boards or air deflectors to prevent high-temperature airflow from directly impacting the platform.
Implement "cold initial adjustment + "Hot-state rebalancing" two-stage leveling mechanism to compensate for thermal expansion differences
III. Operating Procedures: Preventing Human-Induced Faults
1. Standardized Leveling and Support Operations
Perform systematic leveling every 6 months, using an electronic level to check the center and five points at the four corners, ensuring flatness error ≤ 0.1mm/m. Ensure even force distribution on the legs, avoiding stress concentration caused by single-point suspension.
2. Timely Removal of Workpieces
Remove workpieces immediately after welding to prevent plastic deformation caused by prolonged load.
3. Correct Use of Fixtures and Tools
Select standardized fixtures that match the platform's hole system to ensure repeatability. Check the flexibility of moving parts of the fixtures; replace damaged parts promptly.
IV. System Monitoring and Fault Prediction
1. Establish a periodic inspection mechanism
Daily Inspection: Check table cleanliness, hole unobstructedness, and fixture installation status every shift.
Monthly Inspection: Randomly check support leg stress, contact tip wear, and cable connection status.
Annual In-Depth Maintenance: Evaluate overall accuracy using a coordinate measuring machine (CMM) or 3D laser scanning.
2. Introducing Dynamic Sensor Monitoring: Deploy temperature and displacement sensors at key locations to track thermal deformation trends in real time. Combine this with data analysis to predict the next maintenance node, shifting from "passive maintenance" to "proactive prevention."
3. Pay Attention to Typical Fault Precursors: Weld misalignment, uneven penetration, and difficulty aligning fixtures are often early signs of platform inaccuracy. If these are detected, immediately stop the machine for inspection to prevent minor issues from escalating into serious malfunctions.

Send Inquiry